Plumbing emergencies don’t wait for convenient times. A burst pipe, overflowing toilet, or major leak can go from stressful to catastrophic in a matter of minutes. And while calling a plumber is the right first move, what you do before they arrive can make a major difference in the damage—and the cost.
Whether you’re a homeowner or a property manager, knowing how to act quickly and safely in those first few moments can protect your property, limit water intrusion, and even help with your insurance claim.
In this guide, we’ll walk you through exactly what to do when a plumbing emergency strikes—from shutting off the water to protecting your belongings—so you’re not left scrambling when every second counts.
Step 1: Shut Off the Water
A burst pipe can release over 100 gallons in just 30 minutes. The sooner you stop the flow, the more you limit the problem from getting worse while you wait for help to arrive.
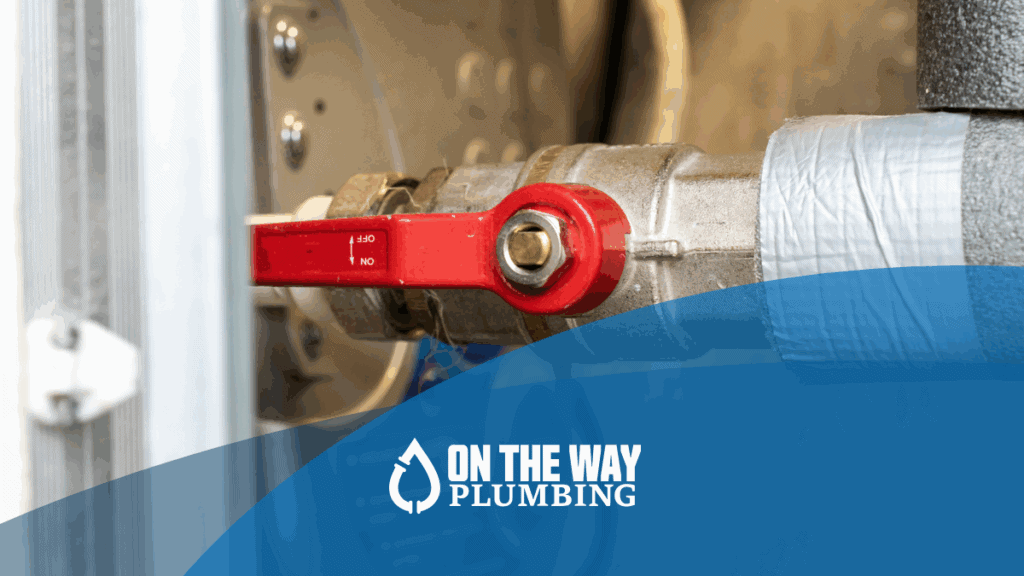
How to Shut Off the Water
Fixture-Specific Valves
These are the small knobs or levers located near sinks, toilets, dishwashers, and washing machines. If the issue is isolated—like a leaking toilet or a burst under-sink hose—start here:
- Turn the valve clockwise (righty-tighty) until it’s fully closed.
- If the valve is stuck or corroded, don’t force it—move to the main shut-off.
Main Water Shut-Off Valve
If the leak is severe or the source isn’t clear, shut off the main supply to the entire house.
- Look for the valve where your water line enters the home—often near the perimeter wall, in a basement, crawlspace, or utility room.
- In some homes, especially in Portland, the main valve may be located outside at the meter box near the street.
- Turn the handle or lever clockwise until it stops.
Pro Tip: If you’re not sure where your shut-off valve is, locate it before an emergency happens—and label it clearly. Just as important: make sure everyone in the household knows where it is and how to turn it off. A shut-off valve doesn’t do much good if the only person who knows about it isn’t home when a pipe bursts.
Step 2: Turn Off the Water heater
Once you’ve turned off the main water supply to your home, the next critical step is to shut down your water heater—especially if it’s still running. Without incoming cold water to cool the tank, a water heater—especially electric ones—can overheat rapidly. This can warp the internal components, crack the tank (leading to a full tank failure), or trigger a pressure release or TPR valve leak.
Shutting it off is a quick way to prevent a plumbing emergency from becoming a mechanical failure as well.
For Electric Water Heaters
- Go to your electrical panel.
- Locate the breaker labeled “Water Heater” and switch it to OFF.
- Never attempt to unplug or disconnect wires directly from the unit—use the breaker.
For Gas Water Heaters
- Find the gas control valve on the water heater (usually near the base).
- Turn the knob to the “Pilot” position (or “Off” if labeled that way).
- Do not turn off the gas supply to your home—just the appliance.
If you’ve only shut off water to a single fixture (like under a sink or behind a toilet), and your main water supply is still on, you can leave the water heater running.
Step 3: Contain the Water (If It’s Safe to Do So)
Once the water flow has been stopped—either at the fixture or main shut-off—the next priority is limiting the spread of any water that’s already escaped. Every minute counts. The more water you can contain or remove early on, the less chance it has to soak into flooring, baseboards, or drywall, where it can lead to mold, structural damage, or costly repairs.
Start with These Quick Actions
- Grab towels, mops, and buckets to soak up visible pooling water.
- Use a wet/dry shop vac (if available) to extract water from floors and carpets.
- Lift or move furniture out of the affected area to protect wood legs and upholstery.
- Place aluminum foil or plastic under furniture legs to prevent staining and swelling.
- Pull back area rugs to allow flooring underneath to dry faster.
Focus on High-Risk Materials
Hardwood floors, carpet padding, cabinetry, and drywall all absorb water quickly. Even if the surface looks dry, moisture often travels underneath or behind these materials within minutes. Drying what you can now can reduce the amount of demo required later.
Stay Safe: Only Act If Conditions Allow
If the leak is near electrical outlets, wiring, or appliances—and there’s visible water near or under them—do not try to clean up the area until power has been shut off to that part of the home (see Step 4). Safety comes first.
Don’t Worry About Getting Everything
The goal here isn’t full cleanup—that’s what the pros are for. The objective is to minimize immediate damage:
- Stop water from reaching unaffected rooms
- Prevent water from soaking into porous materials
- Give your plumber and restoration team a head start
Step 4: Shut Off Electricity in Affected Areas
If you see water pooling near electrical outlets, light switches, appliances, or in any area where power is active, your next step should be to turn off power to that zone immediately at the breaker panel.
How to Shut Off Power Safely
- Go to your home’s main electrical panel.
- Identify the circuit(s) connected to the affected area—look for kitchen, bathroom, laundry room, etc.
- Flip those breakers to the OFF position.
If you’re unsure which circuits control which areas—or if multiple zones are affected—it’s safest to shut off the main breaker until a licensed professional can assess the situation.
Do not attempt to unplug appliances or flip wall switches if water is already on the floor or nearby surfaces.
When to Involve the Fire Department or Utility Company
If the electrical panel itself is wet, or if you hear buzzing, see sparking, or smell burning:
- Do not touch anything.
- Evacuate the home and call 911 or your utility company’s emergency line.
Water-damaged electrical systems can be unpredictable and extremely hazardous.
What About the Appliances?
If you haven’t already shut down the water heater (see Step 2), now is the time. If you suspect your washer, dishwasher, or any other appliance is compromised, leave it off until a plumber or electrician clears it for use.
Don’t Assume It’s Safe Just Because It’s Dry
Even if the visible water has been mopped up, moisture can linger behind walls and under baseboards—places where wires and outlets often run. If you’re unsure whether a space is safe, wait for a licensed plumber or restoration professional to inspect it.
Step 5: Document the Damage
Once the situation is under control—or at least no longer getting worse—it’s time to start documenting everything. Photos and videos taken in the first few hours of a plumbing emergency can be invaluable for your plumber, your insurance adjuster, and your restoration team.
What to Capture
- The source of the problem: a burst pipe, leaking valve, overflowing toilet, etc.
- Affected areas: wet flooring, ceiling stains, soaked drywall, damaged furniture
- Close-ups and wide shots to show both detail and context
- Time-stamped photos or video clips, ideally before you begin cleanup
Pro Tip: Use your phone camera. The timestamps and metadata it records automatically can serve as evidence if needed.
In addition to photos, jot down a few quick details while they’re fresh:
- When you first noticed the issue
- What you did before help arrived
- Any steps you took to shut off water or electricity
These notes don’t need to be formal—but well-documented damage results in faster insurance approvals, more accurate estimates, and less back-and-forth between providers.
Step 6: Ventilate and Reduce Humidity
Once the water has been contained and you’ve documented the damage, your next move is to start drying out the space—as much as possible—before the professionals arrive. Even clean water from a broken pipe can turn into a mold or structural problem if it lingers in flooring, drywall, or framing.
The goal here isn’t full remediation—it’s to slow down the clock and minimize the risk of secondary damage.
Simple Ways to Reduce Moisture
- Open windows and doors to allow cross-ventilation, especially in bathrooms or utility spaces.
- Use fans to move air over wet surfaces—oscillating box fans or ceiling fans are ideal.
- Run a dehumidifier if you have one, especially in closed-off areas like basements or laundry rooms.
- Pull back curtains, rugs, or furniture to let walls and floors breathe.
When to Be Cautious
- Avoid pointing fans directly at saturated drywall or ceilings, as they can deteriorate under pressure.
- If the room has soaked insulation or wet subflooring, ventilation may not be enough—that’s where professional drying and moisture mapping come in.
- Don’t use central HVAC to dry the space unless advised by a professional—it can spread moisture and mold spores to unaffected parts of the home.
Mitigation companies like Oregon Restoration use commercial-grade air movers and dehumidifiers to fully dry water-damaged structures. But when you take these early steps, you can reduce the area that needs demolition, speed up the drying phase, and improve the chance that some materials can be salvaged.
Step 7: Call A Plumber That Can Handle More Than Just the Leak
Once you’ve shut off the water, contained the damage, and taken basic precautions, it’s time to call in professional help. But not all plumbing companies are equipped to handle what happens after the leak is fixed. If there’s been water intrusion—especially into walls, floors, or ceilings—you need a team who can coordinate repairs, assess hidden damage, and help you avoid secondary issues like mold or structural deterioration.
Here’s what happens too often:
- A plumber fixes the leak and leaves.
- You think the worst is over—until mold shows up two weeks later.
- Now you’re calling a second company, dealing with demo, documentation, and a delayed insurance claim.
When you choose a company that works in sync with a licensed restoration team, you avoid that chain reaction entirely.
One Call, Coordinated Response
At On The Way Plumbing, we don’t just fix the leak—we work directly with Oregon Restoration, our in-house restoration partner, to:
- Assess water migration and hidden moisture
- Coordinate mitigation, drying, and demo if needed
- Provide complete documentation for insurance
- Plan repairs and reconstruction if materials were damaged
The result? Less stress, faster recovery, and one team managing the entire process from emergency to rebuild.
What On The Way Plumbing Can Handle That Most Plumbers Don’t
- Standing water and extraction needs
- Wet drywall or subfloor concerns
- Mold prevention and air quality risks
- Project continuity—from plumbing through repairs
So while a basic leak might only need a wrench, a full-blown plumbing emergency needs a coordinated plan. That’s what we deliver—without the back-and-forth between multiple vendors.
A Quick Response Makes All the Difference
Plumbing emergencies don’t have to spiral into full-blown disasters. What you do in the first 30 minutes can determine how much damage your property takes on, how long the cleanup lasts, and how stressful the experience becomes.
By taking fast action—shutting off the water, documenting the damage, protecting your space, and calling a team that handles both the plumbing and the restoration—you’re setting yourself up for a smoother, faster recovery.